Image Index
1600-1700
Several lunar features are quite recognizable in this engraving, the second in the series, based on a sketch made on December 3, 1609. The mountains east of Mare Imbrium (Sea of Rains) form the ring at the top, and the sizable crater at the bottom is probably Albategnius, here quite a bit larger than life, and undoubtedly conveying by its grandeur the impression it made on Galileo's mind. Image source: Galilei, Galileo. Sidereus Nuncius. Venice: apud Thomam Baglionum, 1610, leaf 9 verso.
In the original edition, this page had two lunar engravings: the upper one showed the moon just before third quarter, and the lower one recorded the moon a day later. Here we have two woodcut copies of those engravings, but the order has been reversed, and both woodcuts have been printed upside down, so that the large crater is now at the top and Mare Imbrium is at the bottom. Image source: Galilei, Galileo. Sidereus, nuncius. Frankfurt: in Paltheniano, 1610, p. [18].

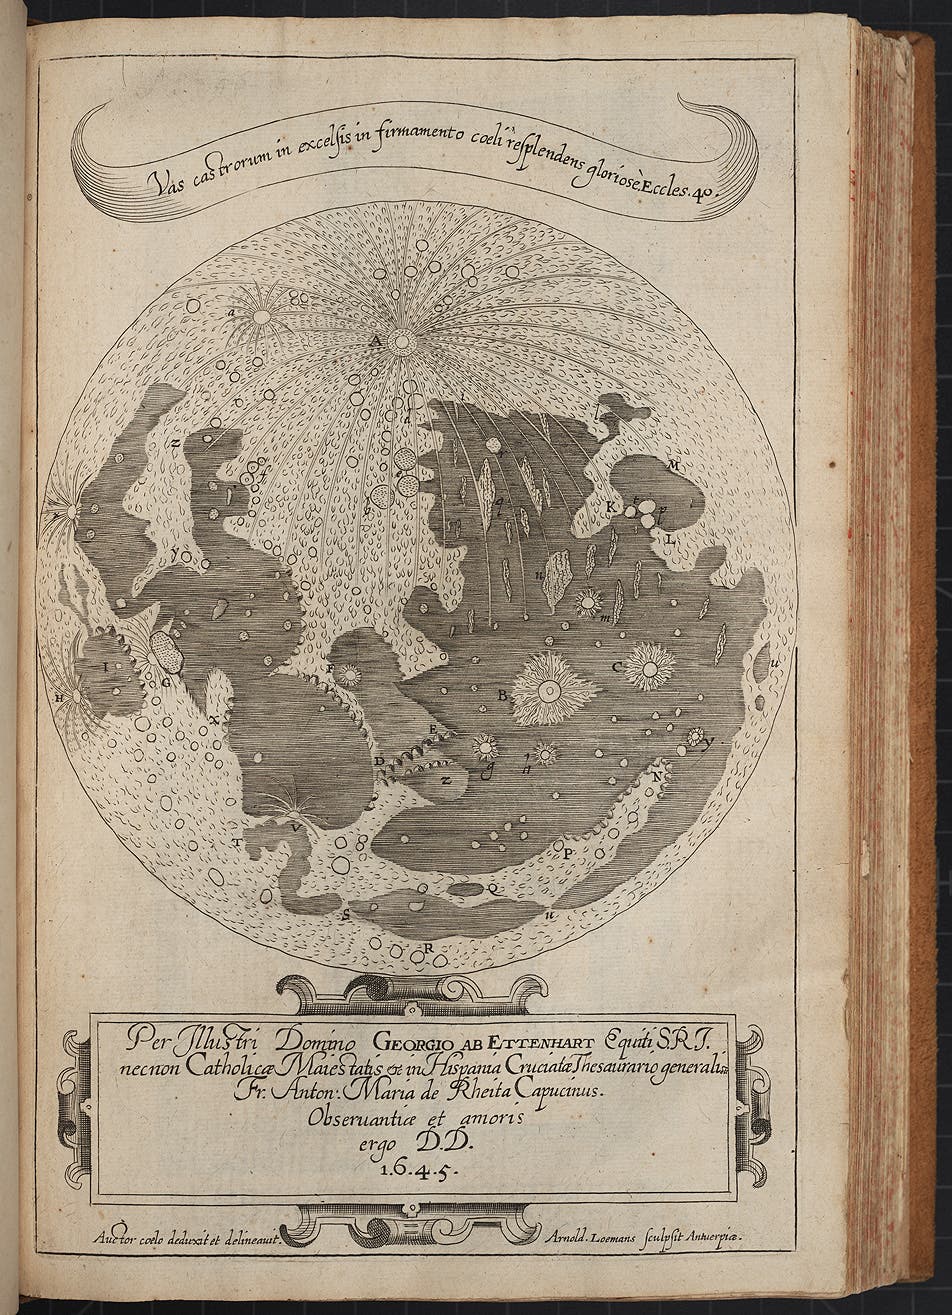
Rheita's map has not been much appreciated, probably because it was so soon eclipsed by the more splendid efforts of Hevelius, Divini, and Grimaldi, but it captures the brilliant ray system of Tycho (feature A) much better than any other illustration to that time, as well as the mountainous nature of the Apennines (E). The floors of the craters Plato (Q) and Grimaldi (u) are properly depicted as black. Image source: Schyrleus de Rheira, Antonius Maria. Oculus Enoch et Eliae, sive Radius sidereomysticus. Antwerp: Ex officina typographica Hieronymi Verdussii, 1645.
The drawing made on December 6, 1645, shows the moon several days after full. It vividly captures the ray systems of Copernicus (D) and Kepler, and the brightness of Aristarchus. The ray that runs from Tycho (C) all the way across the Sea of Serenity to Atlas and Hercules (K and H) is also effectively delineated. Image source: Fontana, Francesco. Novae cœlestium terrestriumq[ue] rerum observationes. Naples: apud Gaffarum, 1646, p. 65.
The illustration shows a detail of the southeast section (bottom-right) of the shadowed moon map. The ray system from Tycho dominates this view, but also evident are the ray systems around Stevinus A and Furnerius A, which appear like a pair of rabbit heads at bottom right. The overlapping trio of Theophilus/Cyrillus/Catharina at upper right also stands out. Image source: Hevelius, Johannes. Selenographia: sive, Lunæ descriptio. Gdansk: Autoris sumtibus, 1647, pp. 262-263, fig. R.
While Divini's map is usually treated as his own handiwork, it is evident that he had one eye at the telescope and the other on the work of his predecessor Hevelius. Compare the southeast quadrants, and if one discounts the different engraving styles, the similarities between the two are apparent, especially the rabbit ears of Stevinus and Furnerius at the bottom, and the pancaked appearance of the maria at right. Additional evidence of copying can be found in Divini's rendition of the region around Kepler, in his perception of a triangle in the Lacus Mortis (Sea of Death) in the north, and in the pattern of the ray system emanating from Tycho. However, there are also enough differences to indicate that Divini did make many observations on his own. Image source: Guericke, Otto von. Experimenta nova. Amsterdam: apud J. Janssonium à Waesberge, 1672, p. 176.
Riccioli's assignment of some of the brightest craters to Copernicans--Kepler, Galileo, Lansberg, and Copernicus himself--has always been a bit of a puzzle, since as a Jesuit, Riccioli staunchly upheld the doctrine of a fixed and central earth. He claimed to have flung the heliocentrists into the Sea of Storms (Oceanus Procellarum), but some wonder if he did not reveal here a secret fondness for the Copernican doctrine, especially since he named two nearby craters Grimaldus and Ricciolus, while other Jesuit astronomers were assigned to craters in the south, surrounding Tycho. Image source: Riccioli, Giovanni Battista. Almagestum novum. Vol. 1, Bologna: Ex typographia haeredis Victorij Benatij, 1651, pp. 204-205.
To make this drawing, Hooke used a 30-foot long telescope and observed just before first quarter, when the shadows were strong. His drawing can be favorably compared with those of later observers (see the Mayer 1775 and Lohrmann 1824 illustrations) and is a considerable improvement over the undefined circles that appear on the maps of Hevelius or Riccioli. Hooke further suggested that since the floor of Hipparchus reflected less light than the mountain tops, perhaps it was covered with vegetation and might be, in his words, a "fruitful place". Image source: Hooke, Robert. Micrographia. London: Printed by Jo. Martyn and Ja. Allestry, 1665, pl. 38.
Much of the detail of the original Cassini map was lost in even the best reductions. One of the most delightful features of the 1679 map was the portrayal of Cape Heraclides on the Sinus Iridum (Bay of Rainbows) as a "moon maiden," complete with face and flowing hair. Here, the promontory (8, at bottom, right of center) has become virtually featureless. (For another view of the moon maiden, see item 32). Image source: Keill, John. Institutions astronomiques. A Paris: Chez Hippolyte-Louis Guerin, & Jacques Guerin, 1746, p. 140, pl. 2.
The illustration shows a detail of the region around Copernicus, in the Oceanus Procellarum (Ocean of Storms); the Kepler ray system is to the left, and Aristarchus is at upper left. (Other depictions of Copernicus can be seen in items 26 and 39). Image source: Zahn, Johann. Specula physico-mathematico-historica. Vol. 1, Nuremberg: sumptibus Joannis Christophori Lochner, 1696, p. 40, pl. 1.
1700-1800
This small engraving, which appears in the text as part of the introductory chapter, shows the crater Plato at the right, with Aristotle and Eudoxus at left, and the mountain range of the Alps cut by the dramatic slash of the Alpine valley. Bianchini noted with surprise that the valley did not appear on the great Cassini map, and he was right; Bianchini was the first to see and to portray this most impressive of lunar valleys. Bianchini also observed that the crater at top center was pictured but not named on the Cassini map. He left it to his successor, Schröter, to take the next logical step and give it the name still used: Cassini. Image source: Bianchini, Francesco. Hesperi et phosphori nova phaenomena siue observationes circa planetam Veneris. Rome: Apud Joannem Mariam Salvioni, 1728, p. 6.
This plate, which shows the region in the lunar highlands around Scheiner and Longomontanus, is remarkable for two reasons. First, it is a mezzotint, the first time this technique was used for a lunar map (if we except a tiny text engraving of the crater Plato by Bianchini, not shown, but in item 11). Second, the engraver failed to reverse the drawing, and so the craters which appear here on the left of the terminator should actually lie on the right. As the caption belatedly explains: "If you want to view the print correctly, you must hold it up to a mirror." Image source: Mayer, Tobias, and Johann Michael Franz. Bericht von den Mondskugeln. Nüremberg: Zu finden in der Homännischen Officin, 1750, pl. 2.
The Mayer map was the first to be based on micrometric measurements. However, the printed coordinate system, the first on a lunar map, did not appear on Mayer’s original map– it was added by Kaltenhofer, at the editor’s request. The detail of the lunar highlands shows Mare Nubium (Sea of Clouds) at the left, the craters Ptolemy and Alphonsus just above center, and Hipparchus and Albategnius parallel to them at right. Image source: Mayer, Tobias, and Georg Christoph Lichtenberg. Opera inedita. Vol. 1, Gottingen: Johann. Christian. Dieterich, 1775, frontispiece.
The most famous rill discovered by Schröter was later promoted to a valley and named in his honor. Schröter's Valley lies just northwest of the crater Aristarchus (for two views, see items 24 and 21). He was also the first to publish a drawing of the renowned Straight Wall, which is depicted here just to the right of the crater Thebit in the lunar highlands. We now know that both the Straight Wall and Schröter's Valley were sketched a century earlier by Christian Huygens, but his manuscript drawings were not published until 1925. Image source: Schröter, Johann Hieronymus. Selenotopographische Fragmente zur genauern Kenntniss der Mondfläche. Vol. 1, Lilienthal: Auf Kosten des Verfassers, bei demselben, 1791, pl. 28.
1800-1900
One of the most attractive features of Lohrmann's maps is the use of multiple levels of shading to indicate light and dark areas of the moon. The detail is from the first section, and shows Mare Vaporum (Sea of Vapors) and what is now called Sinus Medii (Central Bay). Notable features include Hyginus rill at the bottom, Triesnecker just below center, and Hipparchus at the top. It is interesting that the space just left of Triesnecker is blank. Later observers would map an intricate rill system there (see item 31). Image source: Lohrmann, Wilhelm Gotthelf. Topographie der sichtbaren Mondoberflaeche. Dresden: Auf Kosten des Verfassers, 1824, sect. 1.
The Beer and Mädler map is crammed with detail that is almost impossible to appreciate with the naked eye; under magnification, an incredible richness is revealed. The illustration shows a mere corner of the northeast quadrant, with Aristotle at the left and the Alpine Valley at the right. Mädler inaugurated the practice of naming minor craters, such as Egede A, B, and C at bottom center, with Roman letters appended to the name of the nearest large crater. This portion of the map may be compared with the first engraving of the Alpine Valley by Bianchini (see the Bianchini 1728 illustration). Image source: Beer, Wilhelm, and Johann Heinrich Mädler. Mappa selenographica. Berlin: Apud Simon Schropp & Soc. 1834, pl. 1.
The two chromolithographs that decorate the book are among the most vivid of nineteenth-century lunar illustrations. Reproduced is his drawing of sunset over Clavius (top), Maginus (left-center) and Tycho (bottom, with central peak). The region takes on quite a different appearance when depicted as a map (see item 17). Image source: Schmidt, Johann Friedrich Julius. Der Mond. Leipzig: Verlag von Joh. Ambr. Barth, 1856, pl. 1.

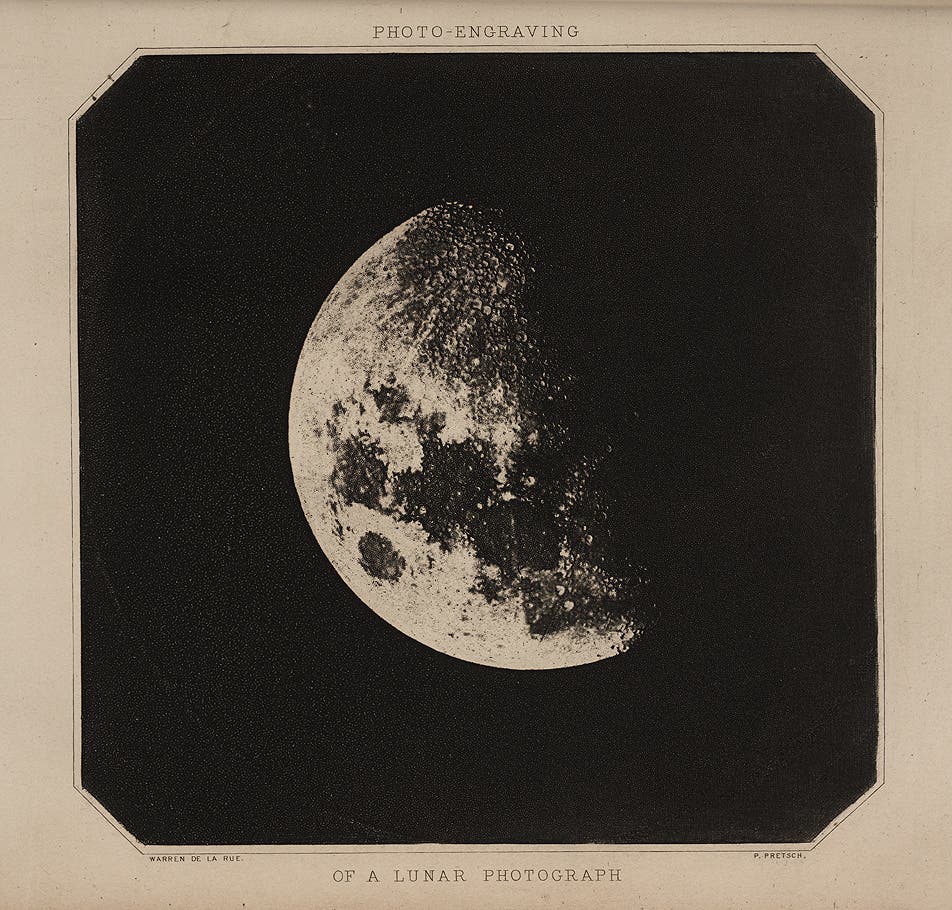
With the assistance of Paul Pretsch, who invented the process, De la Rue succeeded in producing a copperplate for printing from a photographic negative of the moon, by using the unusual swelling properties of gelatin after it is exposed to light. De la Rue called the print a heliotype; we would today call this a photogalvanograph, since the gelatin was electroplated after exposure and treatment. By the end of the century, gelatin-based plates would allow exquisite reproductions of the lunar surface, in the form of photogravures and collotypes. Image source: De La Rue, Warren. “On a photo-engraving of a lunar photograph.” Monthly Notices of the Royal Astronomical Society, 10 Mar 1865, p. 172, pl. 1.
Rutherfurd in 1864 had built the first refracting telescope with an "actinic" rather than a visual focus, which is to say it was designed specifically for the violet light waves (the actinic or chemical rays) that affect the photographic plate, rather than the waves to which the human eye is receptive. The photograph exhibited here was taken at Rutherfurd's observatory in New York City on September 16, 1870. Image source: Proctor, Richard Anthony. The Moon. New York: D. Appleton, 1873, p. 230.
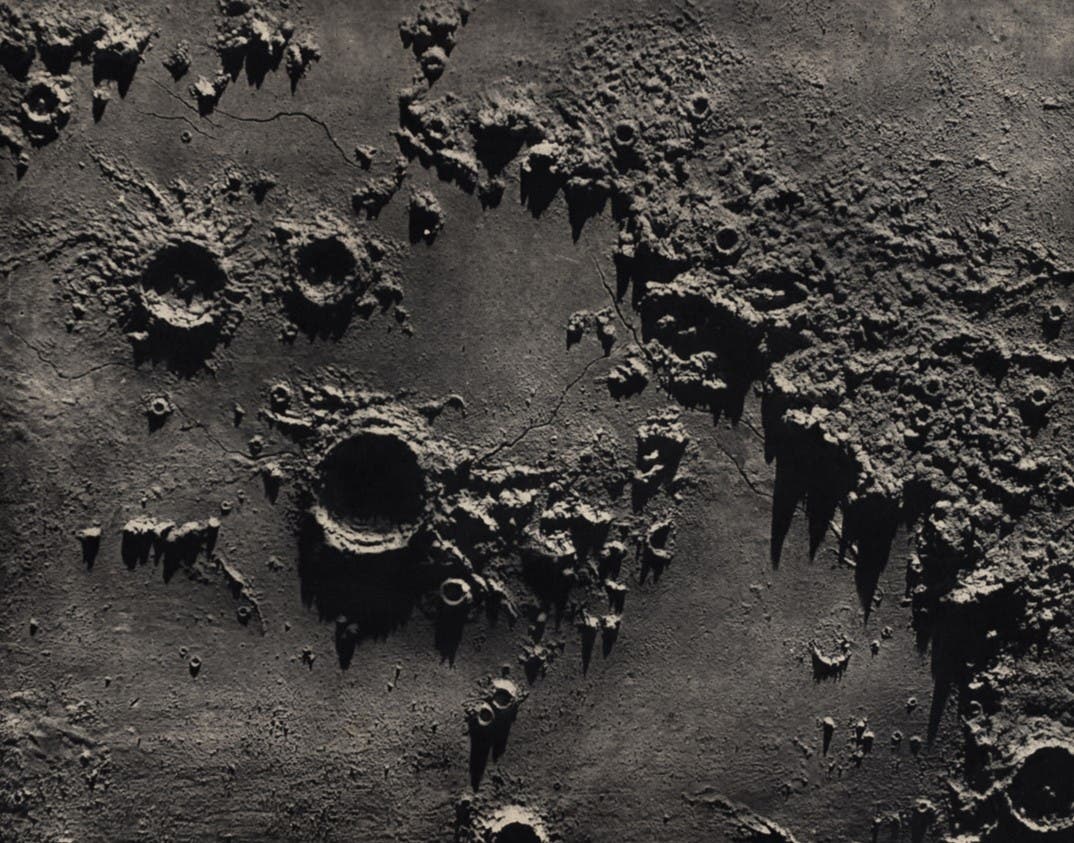
The image shown is a view of Archimedes and the Apennines. The height of the mountains in the model is not quite accurate, for the longest shadow should be cast by Mt. Hadley, the mountain furthermost left of center. In its shadow, nearly one hundred years later, Apollo 15 would become the fourth manned spacecraft to land on the lunar surface. Image source: Nasmyth, James, and James Carpenter. The Moon: Considered as a Planet, a World, and a Satellite. 2nd ed. London: John Murray, 1874, pl. 9.
Plato at sunrise is reproduced here. Plato was one of many lunar features that was suspected of change in the nineteenth century, and the crater floor had been the subject of a special study by W.R. Birt several years earlier. The problem was that some of the craterlets periodically vanished and reappeared, and the floor itself appeared to get darker as noon approached, rather than lighter, suggesting that some kind of vapors or vegetation gradually covered the crater as the lunar day advanced. The variability of Plato was still being advanced by many lunar observers right up until the 1960's. The observed change, however, is entirely illusory. Image source: Neison, Edmund. The Moon and the Condition and Configurations of Its Surface. London: Longmans, Green, and Co., 1876, p. 245, pl. 4.
Section 23 of the map shows the southern lunar highlands, one of the most difficult areas of the moon to map in detail. The illustration represents a small fraction of this section, with the crater Clavius at top (identified by the number 8), Maginus at left center (7), and Tycho at bottom right (1). This detail can be compared with a corresponding detail from the Lohrmann map (see item 18), as well as with Schmidt's earlier chromolithograph (see item 12). Image source: Schmidt, Johann Friedrich Julius. Charte der Gebirge des Mondes. Portfolio, Berlin: In Commission bei Dietrich Reimer, 1878, sec. 23.
Schmidt did depart from Lohrmann in the nomenclature used on the map. Many additional features had been named in the fifty years since Lohrmann worked, by Mädler, Schmidt, and Birt, and Schmidt thought it proper to incorporate these changes. Thus in the illustration of the Clavius/Tycho region, the crater names of Deluc, Pictet, and Saussure--all introduced by Mädler--were added by Schmidt. It is instructive to compare the Lohrmann and Schmidt maps in detail, but it should be remembered that the Lohrmann sections are only half the size of Schmidt's. Image source: Lohrmann, Wilhelm Gotthelf, and Johann Friedrich Julius Schmidt. Mondkarte in 25 sectionen und 2 erläuterungstafeln. Leipzig: Verlag von Johann Ambrosius Barth Arthur Meiner, 1892, sec. 23.
The Society planned from the beginning to issue its own lunar map, "a more complete and accurate map than any now in existence" (Nevill uttered this just before the publication of both the Lohrmann and Schmitt atlases). The first tiny section of that projected map appeared in the first volume, and showed, not surprisingly, the region around the Hyginus rill. The "new" crater is identified with a circled N. Image source: Selenographical journal, vol. 1, no. 6, 28 Aug 1878, diag. 8.
The drawings are a superb testament to Mayer's observing skill. The illustration shows a sketch of Mare Crisium (Sea of Crises) and four craters above on the terminator: Langrenus, Vendelinus, Petavius (with central peak) and Furnerius. Mayer's rendition of the four craters may compared with an early Lick Observatory photograph (see item 25). Image source: Mayer, Tobias. Tobias Mayer’s grössere mondkarte nebst detailzeichnungen. Göttingen: Univ.-buchdr. von E. A. Huth, 1881, sk. 14.
The illustration shows the crater Aristarchus (feature A) in the Oceanus Procellarum (Ocean of Storms), and its companion crater Herodotus (H). The large W-shaped valley below Herodotus is the famous Schröter's Valley. Fauth was one of the most skilled of all selenographers at using the hachure shading technique, which indicates relief by short lines in the direction of maximum slope. Curiously, he abandoned this technique later in his career in favor of contour lines. Image source: Fauth, Philipp. Astronomische Beobachtungen und Resultate. Kaiserslautern: Aug. Gotthold’s Verlagsbuchhandlung, 1893, pl. 20.
This drawing of Mare Crisium (Sea of Crises) was based on a negative taken at the Lick Observatory August 23, 1888. Weinek began with a faint positive enlargement on special paper, and then spent 35 hours highlighting with watercolors. The resulting drawing contains slightly more detail than the direct positive print, and is much more pleasing to the eye. Weinek's artwork may be compared with Tobias Mayer's drawing of a century earlier (see item 20). Image source: Publications of the Lick Observatory, vol. 3, 1894, pl. 2
The illustration shows a detail from the first quadrant, including Mare Serenitatis and Mare Vaporum. Two small craters are of special interest: Linn, just below center in the Sea of Serenity, claimed by Schmidt in 1866 to have vanished, and Hyginus N at top right, claimed by Klein ten years later to be newly formed (see item 19). These purported transformations, Elger remarked, were responsible for the great rejuvenation of lunar studies that occurred in the late nineteenth century. Image source: Elger, Thomas Gwyn. The Moon: A Full Description and Map of Its Principal Physical Features. London: George Philip & son, 1895, pl. 1.
The plate labelled "Aristarchus-Kepler-Grimaldi" presents a grand view of the Ocean of Storms. Schröter's Valley stands out near Aristarchus at the bottom of the detail shown, as does the ray system from Olbers at the right. Particularly striking is the white smear above center. This feature is unique on the near-side of the moon and is possibly the result of an impacting comet. Now known as Reiner Gamma, it is also of historical interest, because Riccioli gave it the name Galilaeus on his 1651 map. When Galilaeus turned out to be a white spot, and not a crater, the name (now Galilaei) had to be reassigned to the insignificant pair of craters just below and to the right. Riccioli won the final round against his Copernican adversary. Image source: Loewy, Maurice, and Pierre Henri Puiseux. Atlas photographique de la lune. Paris: Imprimerie nationale, 1896, pl. 57.
This plate is probably the most eye-catching of the series. The photograph, taken July 26,1896, shows the terminator on four large eastern craters: Langrenus, Vendelinus, Petavius, and Furnerius (bottom to top). The Rheita valley can also be seen to the right of Furnerius. The photograph may be compared to the drawing made by Mayer in 1749, with the terminator in virtually the same position (see item 20). Image source: Holden, Edward Singleton. Observatory Atlas of the Moon. Sacramento? 1897, pl. 14.
The plate of Copernicus was made from a negative provided by the Paris Observatory, taken September 29, 1896. It was enlarged to a scale of over 13 feet to the moon's diameter. The positive was then printed by collotype, which gives the finest grain of any photographic printing process. The grain of the original negative, however, is noticeable. A quite different view of Copernicus can be seen in the photograph taken by Apollo 17 (see item 39). Image source: Weinek, Ladislaus. Photographischer Mond-Atlas: vornehmlich auf Grund von focalen Negativen der Lick-Sternwarte im Massstabe eines Monddurchmessers von 10 Fuss ausgeführt. Vol. 10, Prague: Verlag von Carl Bellmann 1897, pl. 186.
1900-1978
The photograph of the region of Theophilus, Cyrillus, and Catharina, near Mare Nectaris (Sea of Nectar), was printed by a screened halftone process, which is less satisfactory than photogravure, and yet it clearly shows finer detail than the photograph of the same region that appeared in the Lick Observatory Atlas. Image source: The Astrophysical Journal. Vol. 12, no. 5, Dec 1900, Chicago: UC Press, 1895, pl. 21.
Image source: Pickering, William Henry. The Moon; a Summary of the Existing Knowledge of Our Satellite. New York: Doubleday, Page & Company, 1903, pl. 4D.
Illustrated are two of the five plates that show the region south of Mare Nectaris (Sea of Nectar) and Mare Fecunditatis (Sea of Fertility). The rays of Stevinus A and Furnerius A are prominent at the left, taken when the sun was overhead; the rays are absent in the photograph taken near sunset. Image source: Pickering, William Henry. The Moon; a Summary of the Existing Knowledge of Our Satellite. New York: Doubleday, Page & Company, 1903, pl. 4E.
Section 6 shows the southern part of Oceanus Procellarum and Mare Nubium (Sea of Clouds), with the crater Copernicus dominating the bottom of the section. The region depicted contains several sites that would later be visited by spacecraft: Surveyor 3 landed in the open space above and to the left of Lansberg in 1967, and three years later Apollo 12 touched down just 600 feet away. Apollo 14 landed at about the same latitude, further to the left, just below the formation (and the words) Fra Mauro. Image source: Goodacre, Walter. A Map of the Moon in XXV Sections. London: Published by W. Goodacre, 1910, pl. 6.
The posthumous publication contains one of the most impressive drawings of the crater Gassendi ever made. Gassendi has always been a favorite object for observers, because of the intricate rill system on the crater floor. (To see how the U.S. Air Force mapped this same region sixty years later, see item 33). Image source: Krieger, Johann Nepomuk, and Rudolf König. Mond-Atlas. Neue folge, vol. 2, Vienna: In Kommission bei Eduard Heinrich Mayer, 1912, pl. 46.
The photograph, taken September 15, 1919, shows the southern lunar highlands. The crater Maginus is at right center; Clavius is just above it to the right; smaller Tycho (with central peak) is below, near the right margin. As Goodacre himself commented, rather grandly: "These photographs reveal details which do not appear on any chart or previous photograph, and probably are now rendered visible to the human eye for the first time in the history of the race." Image source: Goodacre, Walter. The Moon, with a Description of Its Surface Formations. Bournemouth [Eng]: Published by the author, 1931, pp. 314-315.
The section exhibited shows the two elaborate rill systems near the center of the moon: Hyginus (below center) and Triesnecker (above center). The crater Agrippa is at upper left. Compare Fauth's drawing of the region around Triesnecker with Lohrmann's (see the Lohrmann 1824 illustration), and his treatment of Hyginus with that of the Selenographical Society (item 19). Image source: Fauth, Philipp. Neue Mondkarten und neue Grundlagen einer Mondkunde auf 16 Tafeln. Grünwald bei München: Philipp Fauth, 1932, pl. 1.
The photograph exhibited was taken in 1956 with the 82-inch reflector at McDonald University in Texas. It shows sunset over the Sinus Iridum (Bay of Rainbows), in the Mare Imbrium (Sea of Rains). The Heraclides promontory that juts out at right center is the feature that Cassini saw as a moon maiden in 1679, and many subsequent observers have drawn the promontory with a face and flowing hair. The McDonald photograph however reveals the existence of a second moon maiden at lower left, as the east wall of the crater Maupertuis captures the last rays of the setting sun. Image source: Kuiper, Gerard Peter, ed. Photographic Lunar Atlas. Chicago: Chicago UP, 1960, pl. E2-e.
The map of Mare Humorum (Sea of Humors) contains a variety of lunar surface features. Most notable are the wrinkle ridges to the right of the mare basin. The crater Gassendi is at top left; it may be compared with the photobase drawing by Krieger (see item 29). However, to make the comparison, one of the illustrations must be inverted, for the Air Force maps place north upward, ending the long-standing tradition of depicting the moon with south at the top. Image source: Kuiper, Gerard Peter, D. W. G Arthur, et al. Mare Humorum. St. Louis, Mo: Aeronautical Chart and Information Center, United States Air Force, 1962.
Selected Ranger photographs from the three successful missions were subsequently published by NASA. Exhibited is one that shows most of the crater floor of Alphonsus. These photographs subsequently formed the basis for the most detailed maps of a region of the moon yet attempted, by both the U.S. Air Force (see item 35) and the U.S. Geological Survey (see item 38). Image source: Ranger IX Photographs of the Moon Cameras “A”, “B” and “P.” Photographic ed. Pasadena: N.p., 1965, pl. A-43.
RLC 14 is the second of the Alphonsus sequence; it is filled by the crater, and corresponds more or less to the exhibited photograph from Ranger IX (see item 34). The impact point is indicated on the upper right floor of the crater; the small box indicates the area covered by the next chart, RLC 15. Other lines indicate the trajectory of Ranger IX and the tracks of the six camera axes. Image source: Alphonsus. St. Louis: Aeronautical Chart and Information Center, United States Air Force, 1966.
The illustration is a detail of the lower left quarter of the chart, and the limit of coverage of the Ranger VIII photographs is outlined by dashes. The lack of detail outside the boundary is graphic evidence of the limitations of even the best earth-based photographs. Tranquility Base was established just to the left of the letter "O" in the phrase "Limits Of Effective" at bottom right. The three small craters that stretch across below center from Sabine—B,D, and E—were renamed Collins, Aldrin, and Armstrong after the successful Apollo 11 landing. Image source: Arago. St. Louis, Mo: Aeronautical Chart and Information Center. United States Air Force, 1966.
There were many memorable Orbiter photographs; Orbiter I recorded a beautiful panorama that showed the crescent earth in the distance, and Orbiter II took a stunning oblique view of the crater Copernicus. Less familiar is this photograph of remarkable beauty taken by Orbiter V, looking westward across Mare Fecunditatis (Sea of Fertility). It captures the twin craters Messier and Messier A (the latter a pancake of one crater on another) which have intrigued lunar observers for centuries. The horizontal lines represent the "framelets" produced by the scanning system. Image source: Kosofsky, Leon J., and Farouk El-Baz. The Moon as Viewed by Lunar Orbiter. Washington, DC: National Aeronautics and Space Administration, 1970, p. 98.
This map, one of a pair of the proposed Apollo 15 landing site in the Apennines, is at a scale of 1:250,000. The illustration, which represents only a small fraction of the large folding map, shows crater Hadley C (now just Hadley), the winding Hadley rill, and Hadley delta where Apollo 15 would touch down. The proposed landing site, right of center, is indicated by a small circle and cross. Image source: Carr, Michael H., Keith A Howard, et al. Geologic Maps of the Apennine-Hadley Region of the Moon: Apollo 15 Pre-Mission Maps. Washington, D.C: United States Geological Survey 1971, pl. 1.
It seems fitting to conclude this historical review of depictions of the face of the moon with a photograph taken by the last of the Apollo missions, Apollo 17. It provides a stunning oblique view of the crater Copernicus, looking southward from the Montes Carpatus (Carpathian Mountains). Image source: Masursky, Harold et al. Apollo over the Moon: A View from Orbit. Washington: National Aeronautics and Space Administration, 1978, p. 161.